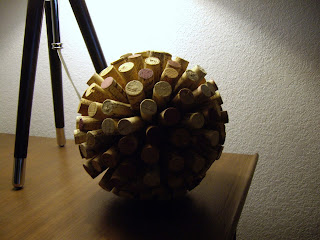
I wish there were a more glamorous name for these...perhaps salvaged wine cork globes? Well, whatever you want to call them I took Sherry, Katie, Emily and Lana's bait, and finally DIYed something I pinned over on Pinterest.
I started with a 5" round styrofoam ball, some craft paint (I choose Americana Gloss Enamels in Honey Brown)...
a one inch foam brush, a glue gun, and a ton of corks (scored from my trip to Healdsburg and the community garage sale). (And you might want to do this on a drop cloth or some old newspapers, cuz it is messy!)
Step one is to pain the styrofoam ball or the white gaps between corks will show, and not in a good way.
Once the paint has dried, start glueing your corks strategically around the ball. (Here's where I would show you pictures, but unfortunately, I stupidly had my memory card out of my camera when I was taking pictures of this step, and I can't find the right cord that attaches the camera to the computer.) But basically, I started by glueing corks all around the circumference of the ball in each direction, and filled in the quadrants with corks.
Within each quadrant I started with straight lines running parallel to the circumference corks, and then filled in as necessary. I thought it looked best with corks of different lengths and widths, so I played around with it. Perfection is not necessary here; variation in texture looks way more interesting in my opinion.
I even played around with the red wine stained corks for some color variation.
I am really pleased with the final product, and I have enough corks left over that I should be able to make a second ball. I have not decided on a final place of honor for my creation, but I am thinking somewhere in the living room would be swell.
Oh, and although others complained of this project taking four + hours, it only took me two episodes of This American Life - which is how I am counting time these days - or two hours. It could easily be accomplished in front of the TV too, if you have one.
Lastly, this textural wonder was fairly cheap to make. The styrofoam ball, foam brush, and paint were about $10 total; the corks were free; and the glue gun I had on hand.
So go forth and make a cork ball, a salvaged wine cork globe...or something else you've pinned on Pinterest.
P.S. I am sharing this project at Young House Love and Bower Power today, so be sure to head on over to check out their projects and many others here and here. You can also see what the other brainchildren behind this idea cooked up; Emily's is here, and Lana's is here.


very nice!
ReplyDeleteVery cool! I have a ton of corks I've saved up, what a great project!
ReplyDeleteI like it! Very good use of my old corks!
ReplyDeleteI love this! It turned out great.
ReplyDeleteThis is very cool! I also save wine corks, but never really do anything with them. I'm also joining the Pinterest challenge today!
ReplyDeleteMake some and send me the pics! I would love to see how others turn out and learn from your techniques. Thanks for stopping by today!
ReplyDeleteMade a wreath this way. Added tooth picks into the corks for stability. Love it.
ReplyDeleteThe tooth pick tip is great. I will try it out next time around.
ReplyDeleteI worked in the wine industry for years and saw all sorts of cheezy cork crafting going on only this one is so chic! LOVE IT!
ReplyDeleteWhat kind of glue did you use?
ReplyDeleteI just used a plain old glue gun. Months later, it's still holding up well.
ReplyDeleteHi. How many corks did you used for each ball? I want to make some for decoration at my wedding and need to know how many corks I should get!
ReplyDeleteThanks
Hmmm...I definitely didn't count. But the corks were in a bag I got from the winery that holds two bottles of wine, and the bag was originally about 3/4 of the way full of corks. After doing the cork ball, it is now only about 1/3 full. Sorry I don't have exact numbers for you, but I hope that helps!
ReplyDeleteHi. Thanks for the tutorial. I have two questions for you. First question, I don't have a glue gun, so what glue would suggest as an alternate? Second question, if I'm not using a glue gun, I guess I would do a section at a time, then let it dry right?
ReplyDeleteThird, and hopefully last, if I want to make it into a stand, just get a small dowel and wood right?